I decided for this week to use the color scheme listed for the November 2021 Paper Pumpkin. Aren't these colors gorgeous together?! I've used Pool Party, Flirty Flamingo and Poppy Parade together before but I don't recall ever adding in a green. Wow! I love these. I've been having a ton of fun with these colors all week. I'm making the most out of my time leading up to gift giving. One thing you can do is give card sets as gifts. Many people often need cards at the ready for any occasion.
Today I'm going to share a few cards with you that I've made featuring these colors. I hope you give this color scheme a try. It's not just for the holidays!
I started pulling all kinds of stamps off my shelf to try with this color scheme. I think it will work for many occasions as well as the upcoming holidays. I decided to focus on gift sets that I could use this color scheme on. It's been a ton of fun playing.
This card uses Artistically Inked. It's simple stamped with just inks, stamps and paper. I stamped on a 5" x 3 3/4" piece of Basic White cardstock. Then I adhered that to my Poppy Parade card base (5 1/2" x 8 1/2" folded in half). Don't forget a piece of Basic White cardstock for the inside too. You can stamp it as well as stamp your envelope. I don't know anyone who wouldn't want to receive a beautiful envelope and handmade card in their mailbox.
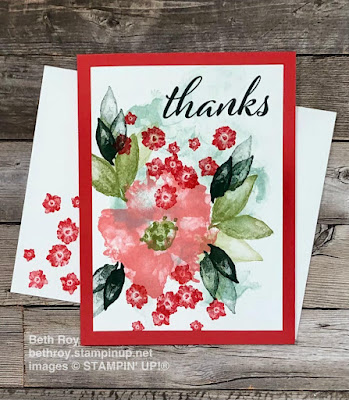
This card uses Hand-Penned Petals and the fun texture stamp from Tasteful Touches. I used the same sizes as the other card. You could make several different cards with different colored card bases or mats and wrap them up as a gift set. 5 to 6 cards simple stamped with a few layers and envelopes fit nicely into an acetate box. You can even decorate the acetate box.
Want to shop for these products? Visit my online store here.
I hope you'll play along with this week's color scheme and have some fun. You can find a place to share your creations on my Facebook page here.
Happy stampin' and have a great week! Thanks for stopping by my blog.
Oh my where did my time go?! Do you all have that issue some weeks. Well I missed my week 11 on my countdown to Christmas. Last week was week 11. I focused on the beautiful Sparkle of the Season bundle.
This bundle is great for more than one holiday. The wreath dies are amazing. It's a must have in my book.
So my first project was a fall card. I wanted to include a pic of this fun fall notecard so you can see the value of this beautiful bundle.
Now on to the Christmas ideas! I choose to use a color scheme of Night of Navy, Basic White and Silver. I love this color scheme for winter holidays.
I used Basic White and Silver foil to build my wreath from the die cuts. The Night of Navy layer is embossed with the Wintry 3D embossing folder. Love how this simple card came together.
Here's a close up of the wreath.
Another idea for Christmas or any time is gift tags. I used similar elements along with the Tailor Made Tags dies to create some fun tags to go with my color scheme. I cut 2 tag bases and adhere them together to make them stronger. The top layer only is embossed.
A set of tags would also make a great gift for friends, family or coworkers.
Here's an up-close pic of my Night of Navy tag. I embossed the top layer with Wintery 3D embossing folder in the pine boughs. Then I added a little sparkle with Wink of Stella.
My Basic White tag is embossed with the Wintry 3D embossing folder in snowflakes. Love the gorgeous texture this adds to my tag.
Enjoy playing with this bundle. I hope you try my ideas. Thanks for stopping by my blog today.
Oh how I love the Peaceful Place suite. It contains all things beautiful. The designer series paper is right up my alley with gray tones, black and white and fun patterns. It has silver foiling too to kick it up a notch.
I decided to make a slimline Christmas card with a layered scene featuring the Peaceful Cabin bundle.
I found some #9 envelopes online in a fun light blue color. This envelope fits my card size but you can also use the next size up #10 envelope. This is a tad bigger and is the normal letter size. You can get it in fun colors too. Spice up your outgoing mail. I also stamp my envelopes to match my card theme.
Measurements:
Card base: 8 3/4" x 7 1/2" scored at 3 3/4" (you can also use 8 1/2" x 7 1/2" if you use many layers so it fits better in this type of envelope)
3 layers that overlap: 8 1/4" x 3 1/4". I used 2 Basic White layers to stamp and die cut and 1 designer series paper layer.
strip of designer series paper: 8 1/4" x 1/2"
Basic White rectangle: 3/4"x 5"
Basic White layer for inside card: 8 1/4" x 3 1/4"
To add a little bling to my card, I brushed my trees with Wink of Stella and also just under my greeting. The greeting is from Heartfelt Wishes. I love the style of this stamp set. I added Wink of Stella to the trees stamped on my envelope too. How fun!
Check out my Facebook live video and see how I made this card. Enjoy! I love making slimline cards especially with sets that build a scene. Isn't this winter wonderland just gorgeous?!
Thanks for stopping by my blog today. Have a wonderful day!
Oh my goodness. I am so sorry I've been really absent from my blog. Well you know, life happens and sometimes things drop off. Let me remedy that! So it's October already and this is when I usually start my Christmas cards. I like to get them done early or yea start them early so I can have plenty of time.
So this year I decided to do something fun. 12 Weeks of Christmas. I'll post a theme each Monday starting October 4, 2021 and show you Christmas cards, holiday gift giving ideas and more. The theme may focus on a color scheme, a stamp set or a stamp bundle. It's gonna be really fun.
First up: a color scheme. I like to mix fun color schemes in with traditional ones. It's your holiday cards and crafts- make them as fun as you want!
For the week of October 4th I'm going to do a Blackberry Bliss, Bermuda Bay, Smoky Slate and Basic White color scheme. Fun- right?!
Today I've made a card with this fun theme and paired it with Snowman Season stamp set. The background has some fun texture added too. I made my background of strips of cardstock and then embossed it with the Tasteful Textile 3D embossing folder. Oooo I love how it turned out!
To make my background I had strips of 1/4" and 1/2" cut from Blackberry Bliss, Bermuda Bay, Smoky Slate and Basic White cardstocks. I cut a piece of Basic White cardstock to 5" x 3 3/4" and adhered the strips in a pattern with liquid glue. You can use whatever adhesive you have. I prefer the multipurpose liquid glue because it has a little wiggle room before it dries.
I stamped my snowman in Basic Gray classic ink on Basic White cardstock and colored in the hat, scarf and nose with Stampin' Write markers. Then I die cut it with a stitched rectangle. The greeting is stamped in Basic Gray as well and the extra snowflakes are stamped in Smoky Slate classic ink. Adhere the strip background to a Smoky Slate card base. Then adhere the snowman layer with stampin' dimensionals.
Here's an up-close pic of the embossed background. After I adhered all the strips, I let the piece dry well. Then I trimmed off any excess hanging over the edge. Once it's dry, choose the embossing folder you'd like to use. Emboss just like you would any other piece of cardstock. This adds some fun texture to your card.
For the inside, I cut a piece of Basic White cardstock to 5" x 3 3/4". I adhered strips along the bottom to look like the background on the front. Then I embossed the bottom of my inside layer as well. I love this little detail and how it adds texture to the inside of my card. We often forget to pretty up the inside to match the front. You can also stamp a snowman on your envelope and color him.
Supplies for this card:
Smoky Slate, Blackberry Bliss, Bermuda Bay and Basic White cardstocks
Basic Gray and Smoky Slate classic ink pads
Blackberry Bliss, Bermuda Bay, Smoky Slate and Mango Melody Stampin' Write markers
multipurpose liquid glue and stampin' dimensionals
Snowman Season stamp set
Stitched Rectangles dies
Tasteful Textile 3D embossing folder
basic crafting tools such as scissors, paper trimmer, cut & emboss machine, clear blocks, stamp cleaner, etc.
I hope you've enjoyed this color scheme and give it a try. I love the dark purple and bright teal together. Check back throughout the weeks and see what else is on my 12 Weeks of Christmas list of fun things. You can also follow me on Facebook @StampingwithBethRoy. I share samples throughout the week and have a Facebook live video on Saturday mornings at 9am eastern. I'd love to connect with you there.
Do you need a demonstrator? I'd be happy to help. Email me at stampandcreatewithbeth@gmail.com with questions.
It's a great time to stock up on these 9 designer series paper packs by Stampin' Up!® . During the month of July 2021 you can get any of these 9 Designer Series paper packs 15% off (US market). DSP helps us create quick cards and can be layered to step it up a bit. What's your favorite DSP pack?
Beauty of The Earth, Bloom Where You're Planted, Hand-Penned, In Good Taste, In The Wild, Pansy Petals, Sweet Symmetry, Tidings of Christmas or You're a Peach?
Here's some of my recent cards using dsp:
I know it's hard to decide. I'm addicted to Designer Series Paper too. Would you like a closer look? Take a peek here and shop the Designer Series Paper Sale now!
Thanks for stopping by my blog today. If you need any help shopping, please email me at stampandcreatewithbeth@gmail.com.
Hello Crafters! I hope you're all well. I've been busy playing with one of my favorite tools by Stampin' Up!®- the Stamparatus. Do you own this tool? If so, how often do you use it? I love to use it to stamp greetings and do fun techniques.
For this card I used it to create a pattern that I could stamp on each corner of my Basic White cardstock piece. This technique is great for creating a batch of cards. I love to give card sets. This is a quick way to make coordinating cards. You can stamp as many as you want and then color them any way you like or choose a few colors and make coordinating sets. Fun, right?!
I placed my Basic White cardstock piece (5" x 3 3/4") in the corner of my Stamparatus. Then I lined my stamps up where I wanted them on the opposite corner. I stamped one in the landscape position and then turned my piece 90 degrees and stamped the other flower in the portrait position. Once they were in place, I just kept rotating my cardstock piece 90 degrees until I had stamped all the corners. I stamped in Basic Gray classic ink. To finish off my stamped layer, I used Stampin' Blends Markers to color my images. My flowers are light/dark Pale Papaya and light/dark Calypso Coral and the leaves are light Old Olive and dark Granny Apple Green. Hello (Biggest Wish stamp set) is stamped in Tuxedo Black Memento ink right in the middle of my flowers. When using the Stamparatus you can reink your greetings and stamp as many times as you want. I stamped hello twice to make it really stand out. I added my stamped layer to a piece of Pale Papaya cardstock (5 1/4" x 4") and that is adhered to a Basic White card base (5 1/2" x 8 1/2", scored at 4 1/4"). This card can be for any occasion. You can stamp some flowers on the inside and write a personal message.
I've had a ton of fun making sets of cards with the Hand-Penned Petals stamp set and the Stamparatus. You can make a variety of cards in all different colors. The stamp set is a two-step stamp set if you want to stamp the flowers instead of coloring. It has a watercolor feel to in and there are some white space left on the flowers and leaves.
I hope you get your Stamparatus out and give this a try. Thanks for stopping by my blog!
Would you like to purchase the Stamparatus, stamps or blends? Please visit my online store here. If you need any help ordering, email me at stampandcreatewithbeth@gmail.com or message me on Facebook by searching @StampingwithBethRoy
Father's Day is around the corner here in the US. It can be a day to celebrate all the father figures in your life or your child's. I've created a fun slimline card for the occasion. Slimline cards are a fun alternate to the standard card size. You have more room to stamp or use designer series paper to add texture and design.
Supplies used:
Well Suited designer series paper #154562 (retiring June 30, 2021)
Balmy Blue cardstock #146982
Smoky Slate cardstock #131202
Basic White cardstock #159276
Basic Gray classic ink #149165
Balmy Blue classic ink #147105
Misty Moonlight classic ink #153118
Smoky Slate classic ink #147113
Watercolor pencils assortment 1 #141709
Watercolor pencils assortment 2 #149014
Blender pens #102845
Blending brushes #153611
A Good Man stamp set #149270
Sailing Home stamp set #149457
Soar Confidently #154531 (retiring June 30, 2021)
Layering Circle dies #151770
Paper Trimmer #152392
Multipurpose liquid glue #110755
Stampin' Dimensionals #104430
Measurements:
Card base 8 3/4" x 7 1/2" scored at 3 3/4"
designer series paper layer 8 1/4" x 3 1/4"
Basic White cardstock 8 1/4" x 3 1/4" for inside card
Smoky Slate cardstock 7 3/4" x 2 3/4"
Basic White rectangle 4" x 2 1/4"
Basic White rectangle 3 1/4" x 2 1/4"
Balmy Blue circle cut using circle #5 (layering circle dies)
Basic White circle cut using circle #6 (layering circle dies)
* I number my dies as #1 being the largest.
For my white rectangles I used the blending brushes to add some color around the bottom and on the edges. I used Balmy Blue and Misty Moonlight classic inks on my water, and Smoky Slate and Basic Gray classic inks for my sand. Then I stamped my images in Basic Gray ink. I colored in the images with the Watercolor pencils and smoothed it with a blender pen.
Stamp your greeting on the white circle and adhere to the Balmy Blue circle. Assemble the card by adhering the designer paper layer, then the Smoky Slate layer. Then add your white stamped rectangles on top. Adhere the layered circle with dimensionals.
On the inside I stamped my Basic White cardstock and colored a boat. I stamped Happy Father's Day from the Soar Confidently stamp set. (Sorry no pic of the inside). I created a fun pocket to hold cash or a gift card using a scrap of the matching designer series paper.
I hope you'll give Slimline cards a try. I've had a ton of fun creating them.
Thank you for stopping by my blog!
Happy Stampin' ~Beth
P.S. This blog post was updated due to Facebook now deleting videos after 30 days. Sorry for any inconvenience.




.jpeg)
.JPEG)
.HEIC)
.jpeg)