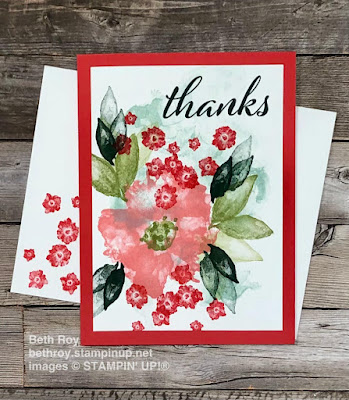
I decided for this week to use the color scheme listed for the November 2021 Paper Pumpkin. Aren't these colors gorgeous together?! I've used Pool Party, Flirty Flamingo and Poppy Parade together before but I don't recall ever adding in a green. Wow! I love these. I've been having a ton of fun with these colors all week. I'm making the most out of my time leading up to gift giving. One thing you can do is give card sets as gifts. Many people often need cards at the ready for any occasion.
Today I'm going to share a few cards with you that I've made featuring these colors. I hope you give this color scheme a try. It's not just for the holidays!
I started pulling all kinds of stamps off my shelf to try with this color scheme. I think it will work for many occasions as well as the upcoming holidays. I decided to focus on gift sets that I could use this color scheme on. It's been a ton of fun playing.
This card uses Artistically Inked. It's simple stamped with just inks, stamps and paper. I stamped on a 5" x 3 3/4" piece of Basic White cardstock. Then I adhered that to my Poppy Parade card base (5 1/2" x 8 1/2" folded in half). Don't forget a piece of Basic White cardstock for the inside too. You can stamp it as well as stamp your envelope. I don't know anyone who wouldn't want to receive a beautiful envelope and handmade card in their mailbox.
This card uses Hand-Penned Petals and the fun texture stamp from Tasteful Touches. I used the same sizes as the other card. You could make several different cards with different colored card bases or mats and wrap them up as a gift set. 5 to 6 cards simple stamped with a few layers and envelopes fit nicely into an acetate box. You can even decorate the acetate box.
Want to shop for these products? Visit my online store here.
I hope you'll play along with this week's color scheme and have some fun. You can find a place to share your creations on my Facebook page here.
Happy stampin' and have a great week! Thanks for stopping by my blog.
Oh my goodness. I am so sorry I've been really absent from my blog. Well you know, life happens and sometimes things drop off. Let me remedy that! So it's October already and this is when I usually start my Christmas cards. I like to get them done early or yea start them early so I can have plenty of time.
So this year I decided to do something fun. 12 Weeks of Christmas. I'll post a theme each Monday starting October 4, 2021 and show you Christmas cards, holiday gift giving ideas and more. The theme may focus on a color scheme, a stamp set or a stamp bundle. It's gonna be really fun.
First up: a color scheme. I like to mix fun color schemes in with traditional ones. It's your holiday cards and crafts- make them as fun as you want!
For the week of October 4th I'm going to do a Blackberry Bliss, Bermuda Bay, Smoky Slate and Basic White color scheme. Fun- right?!
Today I've made a card with this fun theme and paired it with Snowman Season stamp set. The background has some fun texture added too. I made my background of strips of cardstock and then embossed it with the Tasteful Textile 3D embossing folder. Oooo I love how it turned out!
To make my background I had strips of 1/4" and 1/2" cut from Blackberry Bliss, Bermuda Bay, Smoky Slate and Basic White cardstocks. I cut a piece of Basic White cardstock to 5" x 3 3/4" and adhered the strips in a pattern with liquid glue. You can use whatever adhesive you have. I prefer the multipurpose liquid glue because it has a little wiggle room before it dries.
I stamped my snowman in Basic Gray classic ink on Basic White cardstock and colored in the hat, scarf and nose with Stampin' Write markers. Then I die cut it with a stitched rectangle. The greeting is stamped in Basic Gray as well and the extra snowflakes are stamped in Smoky Slate classic ink. Adhere the strip background to a Smoky Slate card base. Then adhere the snowman layer with stampin' dimensionals.
Here's an up-close pic of the embossed background. After I adhered all the strips, I let the piece dry well. Then I trimmed off any excess hanging over the edge. Once it's dry, choose the embossing folder you'd like to use. Emboss just like you would any other piece of cardstock. This adds some fun texture to your card.
For the inside, I cut a piece of Basic White cardstock to 5" x 3 3/4". I adhered strips along the bottom to look like the background on the front. Then I embossed the bottom of my inside layer as well. I love this little detail and how it adds texture to the inside of my card. We often forget to pretty up the inside to match the front. You can also stamp a snowman on your envelope and color him.
Supplies for this card:
Smoky Slate, Blackberry Bliss, Bermuda Bay and Basic White cardstocks
Basic Gray and Smoky Slate classic ink pads
Blackberry Bliss, Bermuda Bay, Smoky Slate and Mango Melody Stampin' Write markers
multipurpose liquid glue and stampin' dimensionals
Snowman Season stamp set
Stitched Rectangles dies
Tasteful Textile 3D embossing folder
basic crafting tools such as scissors, paper trimmer, cut & emboss machine, clear blocks, stamp cleaner, etc.
I hope you've enjoyed this color scheme and give it a try. I love the dark purple and bright teal together. Check back throughout the weeks and see what else is on my 12 Weeks of Christmas list of fun things. You can also follow me on Facebook @StampingwithBethRoy. I share samples throughout the week and have a Facebook live video on Saturday mornings at 9am eastern. I'd love to connect with you there.
Do you need a demonstrator? I'd be happy to help. Email me at stampandcreatewithbeth@gmail.com with questions.
Do you get Paper Pumpkin? What is it you ask? Well, it's an exclusive monthly subscription kit by Stampin' Up! The finished project, stamp set and ink spot color are a surprise. You'll get a size D clear block to reuse with your very first box. I love that it comes with an exclusive stamp set you can only get in Paper Pumpkin and an ink spot. Stampin' Up! does all the work for us. The kits are pre-cut, pre-printed and includes everything we need to complete the kit including adhesives.
The April 2021 kit looks so fun and refreshing! It will coordinate with the Ice Cream Corner suite as well. I love when Stampin' Up! does that and makes our kits go a little further.
Here's the details:
Kit includes enough supplies to make 12 fresh, fun-shaped cards—6 popsicles and 6 blank semicircles to color—and coordinating envelopes. Kit includes card bases, 2 full sticker sheets, decorative die-cut pieces, embellishments, and more.
Envelope size: 4-1/2" x 5-3/4" (11.4 x 14.6 cm)
Coordinating colors: Blackberry Bliss, Bermuda Bay, Bumblebee, Cinnamon Cider, Old Olive, Terracotta Tile
Coordinates with the Ice Cream Corner Suite from our January–June 2021 Mini Catalog.
This kit sounds super fun and it's also great for kids. Yep you read that right- kids. I love stamping with my kiddos. They can send these fun cards to friends and family to brighten their day. The fun shaped cards are great for adults too.
You'll need to subscribe by April 10, 2021 to get this kit. Kits can sell out so sign up soon so you don't miss it. →Subscribe.
Get coordinating products before your kit arrives!
The new Snailed It bundle by Stampin' Up! ® is oh so cute. You'll find this new bundle along with the Snail Mail suite are must haves. These products have been on my desk and in use for weeks. I just can't quit playing with them!
I have been making tons of notecards with the White notecards and envelopes. I'll be sending this cutie out to brighten someone's day. Die cutting your designer series paper (dsp) is a great way to add fun elements to your card and use up that paper stash.
I cut some Flirty Flamingo dsp (polka dot, Brights dsp pack) with a stitched rectangle (Stitched Rectangles, #6 wide stitched rectangle counting from the largest) and Smoky Slate dsp (wood grain, Neutrals dsp pack) with the stitched circle (Stitched Shapes, #2 from the largest). I also die cut a few hears from Flirty Flamingo dsp (wood grain, Brights pack) using the hear in the Snail dies.
My snail and mushrooms are stamped in Basic Gray classic ink. I colored the images with Stampin' Blends markers (light/dark Flirty Flamingo, light/dark Smoky Slate, dark Real Red and color lifter). To add some bling, I colored my snail and some of the leaves with the Wink of Stella glitter brush. I die cut them with the coordinating dies.
I adhered my elements to a Basic Gray cardstock piece (4 3/4" x 3 1/4"), I stamped a greeting from Lovely You stamp set in Flirty Flamingo classic ink on a scrap strip of white cardstock. I added this to the bottom of my Basic Gray layer and then adhered it to the front of my notecard. Don't forget to stamp the inside of your card or handwrite a personal message. You can decorate your envelope with a stamped image or add some extra dsp to the flap. Everyone loves getting a card in the mail with a little note.
For this notecard, I used all the same colors and elements. The only thing that's different is I used the other snail stamp. This one had presents on top of the shell but I trimmed those off with my snips. I switched up the layout a bit making it a mirror image of the first one. I trimmed my greeting a bit shorter and tucked it in at the top.
I added Wink of Stella glitter to the shell and leaves again as well as putting a few of the new Opal Rounds on. The opal embellishments are fantastic and go with any project. So gorgeous!
I used a mini dimensional on my one heart toward the top of my card.
I really love how these notecards turned out. They're so fun. I'll be posting more examples of this bundle with a variety of color combos and the color family dsp packs.
All of the new products can be found in the January-June mini catalog. This suite has many fun elements for all ages. The Snailed It bundle includes the stamp set and coordinating dies. When you buy the bundle you save 10%! The Snail Mail suite includes the bundle as well as Snail Mail dsp, Snail Mail twine combo pack and resin hearts. You can now buy the suite with one product number. So convenient! If you need any help ordering, please message me. I hope this new suite makes your list. I know it's been a definite favorite of mine. It also coordinates with the January Paper Pumpkin kit and add-on.
Check out the Snail Mail Suite collection, the Snailed It bundle and the January Paper Pumpkin Little Love Boxes. You must be a paper pumpkin subscriber to buy past kits, refills or the add-ons. Want to receive the monthly paper pumpkin? You can subscribe here.
Thank you for stopping by and checking out my snail notecards.
Do you hoard your beautiful designer series paper? I must
admit, I’m totally guilty of this. I’m trying hard to use it instead of leaving
it uncut on my shelf. One of my favorite
designer series papers currently available is the color family packs. You get
48 sheets in a variety of colors based on the Stampin’ Up!® color
families.
For my cards today, I used the Brights designer series paper pack.
I picked four colors- Poppy Parade, Melon Mambo, Granny Apple Green and Pacific
Point. I love the pop of bright color against Basic Gray. I love using a couple
of card layouts and making a set of cards. For this set, I used Basic Gray
cardstock for my bases as well as my layer behind my Whisper White stitched
square. It was time to give some love to
my stamps sitting on my shelf. I pulled out Waterfront. It has a great
watercolor look that goes with any occasion. Just pair it with any of your
favorite greetings.
Which color combo is your favorite? Get out that designer series
paper and try one of these layouts. Don’t have a Cut & Emboss machine? No
worries. You can simply cut squares the size you need with your paper trimmer. If
it’s on your list, I have a great way for you to get it and a future discount
of at least 20% on all your orders. Ask me about the starter kit!
You can share your creation with this layout on my Facebook post. I'd love to see what products you use and how you change it up.
Measurements:
Basic Gray card base: 5 1/2" x 8 1/2" folded in half
Basic Gray layer (used with ribbon only): 5 1/4" x 4"
Designer Series Paper layer: 3" x 4" or 3" x 5 1/4"
Scalloped Square: #2 from largest
Square: largest die or cut with trimmer 2 7/8" x 2 7/8"
Stitched Square: largest die
Banner: approximately 1/2" x 3" and hand cut bannered edge.
Stitched Rectangle: smallest narrow die
Ribbon is approximately 4 1/2" band. tape to back of layer. Cut a piece long enough to slide under band and tie a knot.
I used Waterfront, Lovely You, Free as a Bird, and Art Gallery stamp sets. Art Gallery will be available January 5, 2021. Embellishments used are Whisper White faux linen ribbon (Flowers for every season ribbon combo pack), 5/8" Polka Dot Tulle ribbon, Frosted & Clear epoxy droplets, and Elegant faceted gems. Use what you have on hand to bling up your cards. Inks used are Pacific Point, Melon Mambo, Poppy Parade, Granny Apple Green and Basic Gray.
Need a quick gift? Pair these with Stampin' Up!'s Acetate card boxes and gift a set of cards and envelopes.
I hope you enjoyed these ideas for your designer series paper stash. ~Happy stampin', Beth